
Posted by Chuck Iker on 1st Feb 2014
Clay for Bonsai Pots
I get a lot of questions about the type of clay I use to make bonsai pots. Bonsai pots offer some unique challenges for clay selection. Wheel thrown work needs to be plastic enough to throw efficiently as well as being able to withstand trimming and holes in the bottom of the pot. Hand built pots need to join well, dry and fire without warpage in addition to being able to stand up to the firing process. All bonsai pots require penetration of the bottom for drainage and wire tie holes.
Pots often have feet added as separate components. While the slip and score method of attachment is critical to making a good bond, clay selection also plays an important role. Fine grained clay makes the addition of feet more challenging due to the lack of structure within the clay to allow good bonding. I find making a good "pudding thick" slip helps tremendously as does making sure the pot and feet are at the same level of dryness. This allows them to be joined at similar stages of shrinkage. If the feet are wetter than the pot they will dry and shrink at different rates increasing the likelihood of cracks forming at the connection. I usually store the pot and the cut feet in a damp box for 24 hours for the moisture content to normalize on both pieces. My damp box is simply an old upright freezer I have in the studio that I store work in to maintain and control moisture.
I use both cone 6 and 10 stoneware clay bodies. Stoneware clay bodies range from very plastic smooth clay to open bodies with varying amounts of grog and or sand. There are hundreds of commercial clay bodies available. For general pottery It’s likely there is a commercial clay that will meet your color and firing range requirements. But, if you are producing work that has delicate features or needs to dry and fire without warpage it may be necessary to develop your own clay body.
I am constantly experimenting with clay trying to find the best of all features. As of today I have not found the magic formula. Developing a clay body from scratch can get very complicated. Rather than building a body from scratch I use combinations of commercial clay bodies with the addition of fine grog and other components. Because I have a pug mill in my studio it is easy to play around with formulas and add additional materials or mix bodies.
One addition I find to be invaluable is kyanite. This is a refractory often seen in raku clay bodies. Raku is subject to vast swings in temperature causing rapid expansion and contraction during cooling and heating. Kyanite adds some porosity and strength. For larger or more fragile work I will mix in 5 to 10 percent during pugging. Fine sand and grog also work but I find it changes the texture of the clay and affects it plasticity making it more difficult to throw well on a wheel.
When selecting a single commercial clay look at three particular descriptions. Most clays will list their texture, average shrink rate, and average water absorption. Texture will tell you if it is a smooth body or how course it is. Typically the description would be smooth, medium course, slightly course, etc. If you are making a large piece or hand-building you will want a more course clay. It typically will bond better, warp less, and dry evenly. A smoother clay will be easier to throw, will have a much smoother finish when fired and should be dried slower and out of drafts. Usually the shrink rate will be lower on more course clays. They typically shrink at around 10% while a smoother clay could go up to 14%.
Shrinkage numbers are important if you are trying to produce a piece to a particular size. I often am asked to make a pot to say, 8" x 10". As simple as that sounds it's not really. You can do the math and see that to make a 10" dimension you need to have the wet pot at 11 1/4". I have little regard for the published shrink rates. I find that the same clay can vary from 8 to almost 20 %. Placement in the kiln can make a big difference. So, be reasonable when trying to hit dimensions. It's ceramics, you're not fitting a piston into a cylinder head.
Water absorption numbers are really a measure of clay vitrification. Everyone has used a red clay planting pot. The pot absorbs water. You can see a color change where the water has penetrated the clay. This is an earthenware clay body and it is porous. It absorbs water, probably in the 20% range. Stoneware clay vitrifies nearly completely. It will not absorb water when fully fired or at least under 3 or 4 %. For a pot left outside a stoneware body is critical. Water freezing inside the clay will crack and spall the clay. Pot failure is likely.
All of the commercial clay I purchase comes pre-pugged and de-aired but I still run everything through my pug mill. This is my favorite piece of studio equipment. It allows you limitless formula experimentation and allows you to blend clay to the consistency you need for your particular project. Another huge advantage of having a pug-mill is the ability to adjust moisture content. Years of shoving around hard clay on a wheel takes a toll on the body. Wrist and hand damage is minimized and throwing is more enjoyable. A softened clay is great when throwing a large shallow round pot on the wheel. Moving a lot of clay from center out is difficult as it is without having to muscle hard clay. Your ability to keep the clay centered increases and maintaining even wall and bottom thickness is easier. As with any piece of pottery maintaining a consistent wall and bottom thickness will assure even drying and firing.
There are time when a stiffer clay is important. When raising a taller form on the wheel the clays ability to support itself will determine just how high and thin you can go. Clay weakens as it is worked because moisture content raises as you work with the clay. There are a limited amount of lifts you can perform until your clay will just not rise any further. Starting with a stiffer clay allows higher lifts. Often with a bonsai pot you will work a cylinder out from the center to increase diameter or shape a bowl form. Knowing the limits of the clay and your ability will determine success. Often I will stop at a point in the process and either let the clay dry a bit, place a fan on it or even use a torch to speed drying. You can then continue to thin the walls and shape the piece.
The pottery process generates a lot of scrap from trimming and throwing. As much as 40% of your clay ends up here. I make it a specific point to keep all of my scrap clean and separated so that I know what I am working with when I recycle. Having everything separated I know that my scrap bucket contain one specific clay.
This first picture shows the mixing process. I add water and let the mixture set for a day or two to absorb the water and then mix with a simple hand drill and paint mixer.The ability to reuse your scrap and recycle clay saves money and helps you develop awareness of the nuances of clay bodies, texture and feel. As with anything else the more clay your handle the more familiar you become. While the pug-mill I own is capable of mixing and pugging scrap clay I still prefer to mix my scrap in a bucket and dry it to near working consistency before pugging. This process works with or without a pug-mill, you can also hand wedge the clay when the right consistency is reached.

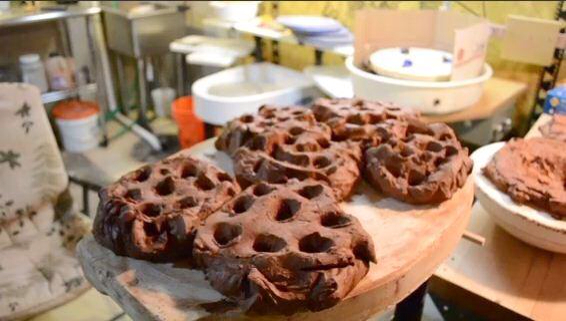
There are a lot of ways to dry the thick slip mixed in the bucket. You can put it in an old pillow case and hang it until it reaches the desired consistency. You can pour it out on newspaper on a concrete floor so the concrete pulls the moisture out. Most often I use a plaster wedging slab I have. I just drop handfuls of the wet clay on the slab. As you can see by the picture I will poke holes in the drying clay to speed the process and even out the drying.
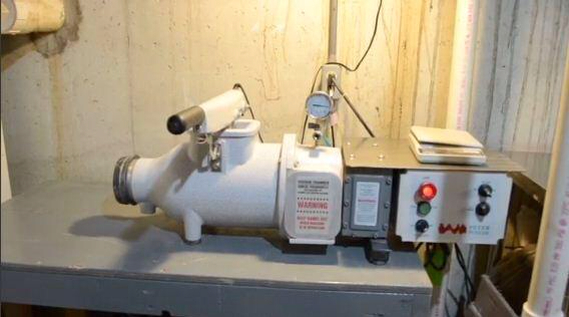
The next series of pictures shows adding the clay to the pug-mill. This particular pug-mill is a Peter Pugger VPM-9. It has a mix function that homogenizes the clay and a pug function that de-aires and pugs the clay out in a nice 3" round pug to be cut to desired length. I go straight from the pug-mill right to the wheel. I rarely have to wedge and often do very few centering lifts on the wheel.


You will never get anywhere in ceramics without reading a little and experimenting a lot. What works well for one rarely works well for another. There are some general guidelines you can follow. I hope I have given you a few. I have seen clay and glazes that I use being used by other potters with wildly different results. Clay is the foundation for anything you will make. It is where your particular hand will show. The shape of your fingers, the pressure you apply, and the finesse you employ will be recorded in it's surface. It photographs your techniques in 3 dimensions.