
Posted by Chuck Iker on 1st Dec 2022
Getting a Start in Ceramics
 Ceramics has been a decades long focus of my attention, interest, and need to make art. It is how I express myself, it is where I find diversion and peace. This is a little bit of my story and offers a few ideas for yours.
Early man created pottery for utilitarian purposes. It allowed him to store, transport and prepare his food. But for all its utility it also provided a surface for decoration and adornment. No matter what man’s invention, he has always expanded utility to include art. Everything man has ever made was adorned for visual appeal no matter how functional or utilitarian the item. I believe this is the essence of pottery. It is the embellishment of utility to an art form.
Ceramics is an art that expresses the artist’s message through both form and function. Function and art are not mutually exclusive. A hand thrown mug can exhibit both function and beauty. An artistic piece most often imitates a piece of functional work.
I possess little if any raw or developed two-dimensional artistic talent. I can sketch a form but I cannot draw a cat. I can create an engineering drawing but I cannot paint a sunset. I am much more comfortable with a third dimension. Shape and form touches me. My eyes and mind operate spatially.
My appreciation for ceramics covers many aspects. I love the process and the inclusion of equipment and technology. I find the details rich and interesting. I love the fact that a child can evoke the same elegance of form as a tenured potter. It’s not the technical correctness of the thrown form; it is the suggestion of motion, flow and color that lends beauty to a piece. Some of my favorite personal pieces are my least technically correct. My kitchen cupboard is filled with coffee mugs, bowls and plates of varying sizes, forms and colors. Together they state a single personal theme; they are mine and they are favorites. I have thrown thousands of pieces. Some I fussed over without satisfaction, some rose effortlessly from the wheel and to continue would only diminish the form.
I often hear this comment: “I’ve always wanted to try that” There is something about pottery that seems to pull people in with the notion that not only does it look like fun, but it also seems like something they think they could do. Both are true.
The purpose of this article is simple. I’d like to promote ceramics and give you a basic understanding of what is involved. I would hope to give you enough information to stir your interest and peak your curiosity. While many of my processes are my own I do follow relatively standard ceramic procedures that apply to most applications of the art form. As you’ll discover there are as many ways to accomplish the same process but there are general guidelines that hold true no matter what. I’ll cover the process only as an overview. There are hundreds of books, DVD’s, and internets sites available that describe process in more detail.
I often start my classes by asking if anyone owns any handmade pottery. It is rare to find anyone in a pottery class that didn’t get there through admiration of someone else’s work. If you can see value in craft, if you appreciate and recognize the feel of a handmade piece over a cast “perfect” vessel, you have 50% of the requirement for being a good potter behind you. You have separated yourself. You have the ability to recognize intrinsic value and a raw appreciation for the handmade vessel. If you cannot feel the”hand” of the potter, if your eye only appreciates the monotonous perfection of mass produced ceramics then look for others means of artistic expression.
The next requirement involves the issue of patience. Are you already ordering an art fair tent? You would be surprised at just how many people I’ve met whose mind has worked that far forward before they ever get mud on their hands. They see themselves first as the person responsible for the creation, second as one capable of creating. It’s all about the process - love the process, not the result… yet. Love of the process will yield the result you seek.
Making a pot in a classroom environment has its rewards. Glazing your pots with studio glazes and firing in the studio kiln s fun as well. However, working your own materials, making your own glazes, choosing your own clay bodies and developing your own style is the end-game. Work toward the goal of feeling comfortable calling yourself a potter. It is a description that will evade you throughout your journey. The most accomplished potters I have met are also the most humble. It is rare to find a potter that is completely satisfied with their work.
Pottery Classes
Due to the need for specific equipment, most people tend to start out in a class environment. There are other approaches and I will discus those a bit later. Taking a class is also an excellent way to get a feel for the art and your true interest. Most of us have a closest somewhere in the house where we hide projects or crafts that we plan to get back to one of these days. You would have been so much beter off had you been able to rent or borrow the equipment and tools. Taking a pottery class affords you the opportunity to do just that in additional to the benefit of getting professional instruction.
Almost every major city in the country has teaching studios. Often YMCA’s and other community centers offer pottery classes. These classes are relatively inexpensive but the disadvantage is that they often have less than modern equipment and at times less than ideal instructors. My suggestion is that you look on the Web or yellow pages and find a teaching studio that offers small classes with good equipment and plenty of kiln capacity. You will want some of your first successful pieces fired. Be sure your studio has the equipment and ability to handle firing and that they have a variety of equipment to allow you to experience it’s use. You will want to get the entire experience of a working studio, not a place where a quilting class will take place in two hours.
I would like to tell you that people in ceramics are all wonderfully open and inviting people. For the most part they are. However, as with anything that involves groups of people involved in common interests there tends to be studio cliques formed. Frankly, some studios can come off as unfriendly and pretentious. You will pick this up on your first visit. If they do not take the time to show you around and make you feel at home, move on. Some studios will drop a newbie in the middle of their intermediate classes just for tuition fee. This is not comfortable and I suggest you avoid it entirely. Ask about their beginners classes and state your apprehension. You should be in a class with a willing instructor with like-skilled future potters. You are going to mangle some clay so be sure the experience is fun, not embarrassing or stressful. Trust me; clay mangling is not just for the new potter. Even the most experienced potter folds a form occasionally.
Pottery always brings the image of a potter’s wheel to mind. Ceramics is a deep and expansive artistic medium. There are ceramic artists who never turn a wheel on. There are accomplished potters who throw entirely on a wheel. There are those who concentrate on earthenware, hand painted pottery, and those who specialize in high-fired stoneware. There are hand builders, wheel potters, sculptors, tile makers, and mold makers. There is a place within ceramics for your talents. The art is open to all. All that is necessary is desire.
If the thought of a potter’s wheel intrigues you, start with a throwing class. If you find that a little too intimidating then take a hand building class. Both afford you the opportunity to get your hands dirty. Some studios will require you to start with a hand building class to introduce you to the basics. That is fine, and probably a good idea. However, I find that a student who just wants to experience the wheel needs to be on one ASAP. It is your money and your time. You can still be introduced to the details along the way.
What I do recommend is that you take both hand building and wheel throwing eventually. It is important that you understand the processes of both. A wheel thrown pot can be embellished with the addition of feet or handles. A hand built piece may benefit from the addition of wheel thrown elements. I use both daily in my studio and my work.
Go It Alone
Can you teach yourself ceramics? Of course, you can teach yourself anything. Is it a good idea? It depends upon you. Truthfully, I had a wheel long before I ever took a class. However, I built my own wheel. My initial excursion into pottery was as much a fascination with the wheel and its workings as it was anything else. I have an engineering background and an aversion to buying anything that I can build. My problem is recognizing my limitations in manufacturing a piece of equipment in the garage with hand tool. Actually, I have never recognized my limit, but that is a whole other story. The fact is, I throw on my own wheel today. It has all the bells and whistles, electronic speed controller, DC brushless motor, all that. I have used many professional wheels and find myself favoring my own.
My first kiln was an old used Paragon I bought for $50 from the classified ads. It did not have a kiln sitter or electronic controller. I fired quite a bit of work in that broken down kiln. In addition to being a safety hazard it required that I stay with the kiln throughout the firing. Shutoff involved a thermometer and yanking the plug. Glaze and clay body maturity was almost a guessing game. Today my kilns have computer controlled firing and cooling programs and operates without my involvement. While the convenience of technology leaves more time to create, learning to fire with a manual kiln greatly expands your knowledge and feel for the process. For the record, I’d not go back.
Eventually I realized I needed to spend some time around tenured artists. I spent about a year in a class and shared studio environment. The experience was worthwhile but short lived, probably due to my own impatience. Once I picked up some fundamental techniques, I became bored and felt constrained so I went back to my studio to refine my techniques. Beyond actual studio classes, I find 2-3 day seminars to be excellent ways to interact with your peers, gain some outside expertise, and keep both your process and work fresh.
I later spent some time teaching beginner’s classes but again found the process too structured and quite frankly I did not agree with the studio’s approach to starting students out. It almost seemed desirable to convince the students that pottery was complicated and tedious. Regardless of what conventional teaching techniques dictate I felt that it was important to move to a place of satisfaction as soon as possible. Don’t make a new student spend 4 weeks centering a piece of clay when you can help them along and help them make a coffee mug they can actually use and enjoy. Centering and technique will come along a little at a time.
Working on your own is as simple as buying a few boxes of clay, a rolling pin, and board to work on. Many studios rent kiln space and prepared glazes are readily available at either your local pottery supply or off the internet. The craft is within your reach no matter what your budget or level of interest.
Cost
Potters wheels are like treadmills; a lot of people have them, few use them. EBay, Craig’s List, and classified are full of slightly (if ever) used pottery wheels. A kiln is nice to have but there is always kiln space available for rent. You could very easily purchase a used wheel and the tools you would need to set up a beginner studio for $500 - $1,000 if you take your time and shop well.
If a new wheel is what you’re after go to the Internet. As much as I prefer buying from local sources, I also prefer getting a deal. Wheels are so incredibly reliable these days that buying from an internet supply house is riskless. Many very good suppliers on the Net will stand behind your purchase as well as the shop down the street. Savings are usually in the hundreds of dollars. There are numerous manufacturers and a wide range of prices. Most features are almost identical. I do recommend buying the largest wheel head you can afford and be sure to see if the wheel has a reversing switch in the event you are a leftie like me.
There are some very nice kilns out there at good prices. My first real pottery kiln was an Olympic 1818HE with an electronic controller. I believe these are still in the $1000 range and can produce very professional work up to cone 10. Today I have L&L kilns. I have nothing but good things to say about them.
Prepared Clay
I have worked with my own formula, prepared clay, locally dug clay, and recycled clay from my bins. There are so many good prepared clays out there it would be nearly impossible not to find one that meets your needs and preferences. Due to the high cost of shipping clay it is important that you find a local pottery supplier to buy from. All of the clay suppliers list dealers. You can Google these names for more information on clay:
- Standard Clay
- Laguna Clay
- Highwater Clay
One major decision you will need to make is what type of clay and at what cone you will work with. There is nothing to say that you can’t work in all, but develop skills in one area and then move to others. You will see clays listed by firing range and clay type. There are three basic types of clay. These are earthenware, stoneware and porcelain.
Before we can discuss clay type you need to understand “cone”. Cones are simply a measure of the heat required to fire your clay. They are essentially a temperature sensitive ceramic cone that melts at a specific temperature. They give you the ability to measure heat work. Once they bend to the point where the tip touches the temperature for that cone has been reached.
Earthenware is a low fire clay. When fired it produced a hardened but open (porous) body. Terra Cotta clay planters are earthenware. They will wick and expel moisture. There are air pockets between the fired clay particles. Earthenware would break if water logged and frozen. Earthenware can be, and is often glazed. Earthenware glazes tend to hold their vibrant colors better when fired than the higher fired stoneware glazes which tend to be more earth toned and muted.
Midrange stoneware is considered cone 6 clay. This clay body is vitrified at cone 6 (2180 deg F). It will fire to a hardened state where water will not penetrate the body. The clay has moved to an almost glass phase (vitrification). It will have a distinctive stoneware ring when tapped. It is suitable for cooking and drinking vessels, planters, plates, bowls, and art pottery.
High fired stoneware is not much different other than it is fired to cone 10 and may be additionally vitrified depending on the clay body. Glaze tends to react somewhat differently at cone 10 than 6 but there are many potters working at cone 6 and producing work identical to cone 10. Most cone 10 potters work with gas or wood fired kilns to reach these high temperatures but today most electric kilns are capable of reaching cone 10.
There is a general trend toward Cone 6 stoneware driven by cost savings and the impression they are “greener”. I suppose there are a few supporting points to this but I find mid range to be user friendly and more predictable as far as results are concerned. It is really a personal preference. There is not much“green” about the clay firing process. It is energy intensive no matter what the fuel. As much as I would like to have a wood-fired kiln I cannot justify the volume of wood the process consumes. I do not consider myself a tree hugger but I take ethical exception to the process. Gas and electric is a much better option from a pure green perspective.
Porcelain is best left for later in your development. It can be challenging to throw and form. Due to porcelain’s delicate and transparent properties, it is usually thrown very thin. It is most often a high fire clay body. Porcelain makes an excellent long range target for your development.
Just for reference the actual temperatures of these cones are as follows:
- Earthenware Cone 04 (1980 deg F)
- Mid Range Stoneware Cone 6 (2180 deg F)
- High Fire Stoneware Cone 10 (2250 deg F)
Process Overview
As earthy, folksy, and organic as pottery may seem the process is somewhat involved. It’s not necessarily complicated but the craft is certainly a technically rich field. It is a never ending learning process.
Shaping a block of clay into a meaningful or functional form is only a small part of the ceramic process. There are really 6 major phases from start to finish.
- Preparing the clay
- Forming the clay by wheel or by hand
- Proper and slow drying of the clay
- Bisque firing
- Glaze application
- Final firing to melt the glaze and vitrify the clay
I’ve touched on the forming process. The next and very important phase is drying the piece. Clay gives up water slowly and somewhat unevenly. It is important to retard the drying process so that the piece stays relatively the same level of saturation throughout the drying process. If a piece is dried unevenly it will warp and possibly crack either at the drying phase or later in firing. Often pieces are covered with plastic or kept in a drying box to even out and slow down the drying. A piece will usually shrink 5 – 10% during initial drying. This shrinkage is due to the volume of water being subtracted from the volume of the piece. The overall volume is reduced.
Most work is fired in two steps. The first is called bisque. This first firing burns out the organic compounds in the clay and hardens the clay but keeps the body open like a sponge so that glaze will absorb into the surface and stick.
The next step is to glaze the piece by either dipping, brushing or spraying. The piece will absorb the water from the glaze and leave a layer of the glaze solids on the surface. The piece must be again dried to evaporate the water. This process can take place quickly and a potter will often place these pieces where there is heat or a draft just to expedite the process.
The final firing is where all of the magic happens. This is the final cone firing to bring the clay to vitrification and melt the glaze. The early part of this firing can go somewhat quickly since all of the organics are already burned out. The objective is to reach the temperatures above the bisque level to finalize the glaze melt.
How much temperature and over what time varies by stage of the process and development of firing schedules is an article in itself. The important point is, this information is readily available and in a format that can be understood and mastered. It is NOT as complicated as it sounds. Anyone with the desire can absorb and apply these steps with ease. It is merely a matter of research and following directions.
Many types of finishes can be achieved by varying the firing temperatures and ramp speeds. Using gas or wood fired kilns will result in much different finishes than electric primarily due to the amount of oxygen present in the process. This is referred to as oxidation and reduction atmospheres. An electric kiln fires in an oxidation atmosphere. A gas or Wood kiln is capable of reduction. Again, it is intriguing and interesting but not overwhelmingly complicated. These are not things you have to be an expert on to get a start in Ceramics. They are development and learning issues.
Many of the pots I produce have no glaze at all. I use a variety of ceramic oxides and ceramic stains to add color or highlight to the piece. I apply these by either spraying or hand rubbing after the bisque. I do on occasion single fire some pieces. This process combines the bisque and glazing firing heat profile to allow you to load a dried raw clay piece and finish with a fully vitrified piece in one kiln firing. This is an area I experiment with continually. I like the natural finishes it gives me and I really like the single-fire process from a onmental responsibility perspective.
The Joy of Serendipity
The most intriguing aspect of ceramics is the tenuous control you sometimes have over the outcome. It is rare to have your expectations satisfied. The results are sometimes disappointment, sometimes pleasant surprise. Clay and glazes are a living medium. They react to their firing environment, temperature, location in the kiln, and chemical makeup. My best creations are often my least expected. A pot can pick up a blush of color from a pot sitting next to it in the kiln. A form can settle into a more organic shape during firing. A change in clay body can react totally different to your favorite glaze. Colors can mute or alter, finishes softens or gloss. This may sound like controlled chaos, but it is not. Control of the process comes from experimentation and perseverance. Experimentation and perseverance develops individual style.
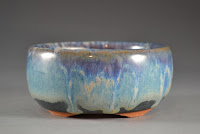
Due to the type of work I produce I have an accepted rate of failure. I specialize in bonsai pottery which is essentially a bowl form with the addition of feet and holes. Both features tend to cause cracking and warp-age. Rectangular and oval pots are usually a combination of hand, slab, and wheel built parts that are joined at assembly. These wide flat forms are also very prone to cracking and warping. I have spent many years developing my own clay formulas that minimize these faults. As cliché as it may sound, ceramics is a journey. It is a never ending investigation of what works and what doesn’t. This is all part of the enjoyment of ceramics.
When things work it is very fulfilling. When it doesn’t, take it in stride, hit it with a hammer, and try it again. If you can’t let go, mediocrity will fill your shelves. Set a high standard for your work and take failure as a learning experience.
Ceramics Information
I have two favorite monthly publications, Ceramics Monthly, and Pottery Making Illustrated. You would be hard pressed to find a table or bookcase in my house that doesn’t have a dog eared copy of one of those two. I highly recommend you get a subscription. They are informative, idea generating publications. Visit some art fairs and look at other’s work. Do them and yourself a favor and purchase a few pieces. You will be supporting the ceramics community and expanding your collection.
INTERNET POTTERY SUPPLIES - just to mention a few
Sheffield Pottery Ceramic Supply
Big Ceramic Shop
Axner Pottery and Ceramic Supplies
Bailey Pottery Supplies
Clay world
Kentucky Mudworks
Sheffield Pottery Supplies
PUBLICATIONS
Ceramics Monthly
Pottery Making Illustrated
Clay Times
Studio Potter
INTERNET CERAMICS COMMUNITIES
Clay Art http://groups.yahoo.com/group/clayart/
Ceramic Arts Daily http://ceramicartsdaily.org/
Ceramic Arts Community http://ceramicartsdaily.org/community/

Commissioned 24” Semi Cascade Pot
Copyright, 2015, Chuck Iker, Iker Bonsai Pottery, Batavia, Ohio www.ikerbonsaipots.com